2023. 10. 22. 23:00ㆍJava언어 공부
import javafx.application.Application;
import javafx.event.ActionEvent;
import javafx.geometry.Insets;
import javafx.geometry.Pos;
import javafx.scene.Scene;
import javafx.scene.control.Button;
import javafx.scene.control.Menu;
import javafx.scene.control.MenuBar;
import javafx.scene.control.MenuItem;
import javafx.scene.input.KeyCombination;
import javafx.scene.layout.Background;
import javafx.scene.layout.BackgroundFill;
import javafx.scene.layout.BorderPane;
import javafx.scene.layout.CornerRadii;
import javafx.scene.layout.HBox;
import javafx.scene.layout.Pane;
import javafx.scene.paint.Color;
import javafx.stage.Stage;


public class ChangeColor extends Application{
	private Button blueButton = new Button("Blue");
	private Button redButton = new Button("Red");
	private Button whiteButton = new Button("White");
	private MenuItem blueChoice = new MenuItem("Blue");
	private MenuItem redChoice = new MenuItem("Red");
	private MenuItem whiteChoice = new MenuItem("White");
	private Pane centerPane = new Pane();
	private Background whiteBackground =
			new Background(new BackgroundFill(Color.WHITE, CornerRadii.EMPTY, Insets.EMPTY));
	private Background blueBackground =
			new Background(new BackgroundFill(Color.BLUE, CornerRadii.EMPTY, Insets.EMPTY));
	private Background redBackground =
			new Background(new BackgroundFill(Color.RED, CornerRadii.EMPTY, Insets.EMPTY));

	public void changeToWhiteBackground()
	{
		centerPane.setBackground(whiteBackground);
	}

	public void changeBackground(ActionEvent event){
		Object source = event.getSource();
		if(source==blueButton||source==blueChoice)
		{
			centerPane.setBackground(blueBackground);
		}
		else if(source==redButton||source==redChoice)
		{
			centerPane.setBackground(redBackground);
		}
		else
		{
			centerPane.setBackground(whiteBackground);
		}
	}

	private MenuBar consturctMenuBar()
	{
		blueChoice.setOnAction(e->changeBackground(e));
		redChoice.setOnAction(e->changeBackground(e));
		whiteChoice.setOnAction(e->changeBackground(e));

		blueChoice.setAccelerator(KeyCombination.keyCombination("shortcut+B"));
		redChoice.setAccelerator(KeyCombination.keyCombination("shortcut+R"));
		whiteChoice.setAccelerator(KeyCombination.keyCombination("shortcut+W"));

		Menu colorMenu = new Menu("_Change Color");
		colorMenu.setMnemonicParsing(true);
		colorMenu.getItems().addAll(blueChoice,redChoice,whiteChoice);
		Menu helpMenu = new Menu("_Help");
		helpMenu.setMnemonicParsing(true);
		helpMenu.getItems().add(new MenuItem("Welcome"));
		MenuBar menuBar = new MenuBar();
		menuBar.getMenus().addAll(colorMenu, helpMenu);
		return menuBar;
	}
	private Pane constructButtonPane()
	{
		HBox buttonPane = new HBox();
		buttonPane.setAlignment(Pos.CENTER);
		buttonPane.setPadding(new Insets(10d));
		buttonPane.setSpacing(10d);
		buttonPane.getChildren().addAll(blueButton,redButton,whiteButton);
		blueButton.setMinWidth(80d);
		redButton.setMinWidth(80d);
		whiteButton.setMinWidth(80d);
		blueButton.setOnAction(e->changeBackground(e));
		redButton.setOnAction(e->changeBackground(e));
		whiteButton.setOnAction(e->changeToWhiteBackground());
		return buttonPane;
	}

	@Override
	public void start(Stage mainStage) throws Exception
	{
		centerPane.setBackground(whiteBackground);
		centerPane.setMinHeight(300d);

		BorderPane mainPane = new BorderPane();

		mainPane.setTop(consturctMenuBar());
		mainPane.setCenter(centerPane);
		mainPane.setBottom(constructButtonPane());

		mainStage.setTitle("Changing Colors");
		mainStage.setScene(new Scene(mainPane));
		mainStage.show();
		mainStage.setResizable(false);
	}

	public static void main(String[] args) {
		// TODO Auto-generated method stub
		Application.launch(args);
	}

}
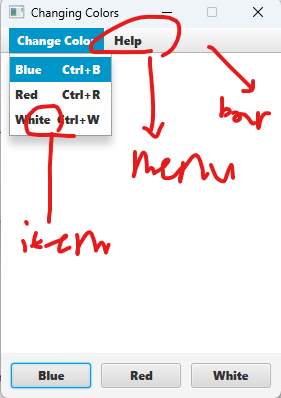
색깔을 바꾸는 프로그램이다.
모든 노드가 지원하는 사건
- ActionEvent : 버튼을 누르거나 메뉴를 선택하는 경우
- KeyEvent : 사용자가 키를 누른 경우
- MouseEvent : 사용자가 마우스를 조작하였을 경우
- TouchEvent : Touch 이벤트 처리가 가능한 장치를 조작하였을 경우
- WindeowEvent : 윈도우의 변화 (열림, 닫힘, 아이콘화 등)가 발생한 경우
메뉴
MenuBar, Menu, MenuItem으로 구성되어있다.
- MenuBar에는 여러 개의 Menu를 추가할 수 있다. 각 Menu에는 여러 개의 MenuItem을 추가할 수 있다.
- MenuItem은 Menu의 부모 클래스이며, Menu에 Menu를 추가하여 부분 메뉴를 제공할 수 있다.
- MenuBar는 BorderPane의 경우 Top에 추가해서 사용할 수 있다.
- 메뉴 선택 사건은 버튼 선택과 유사하게 처리한다.
- ContextMenu (팝업메뉴)를 사용할 수 있다.
분리자 : SeparatorMenuItem 이용한다.
MenuItem과 단축키를 연결하여서 사용할 수 있다.
redChoice.setAccelator(KeyCombination.keyCombination("shortcut+R");shorcut은 Ctrl 혹은 command키를 나타낸다.
Pane의 종류
- TabPane : 여러 개의 화면이 동시에 필요할 경우 TabPane을 사용할 수 있다.
- TilePane : 격자 형태로 노드를 배치하나 이 격자의 크기는 항상 같다.
- SplitPane : 분리자를 추가해준다.
- AnchorPane : 추가되는 노드의 위치를 위. 아래로 왼쪽, 오른쪽을 기준점으로부터 상대적 거리를 유지하도록
만들 수 있다.
'Java언어 공부' 카테고리의 다른 글
| [Java] 15. 조건문과 반복문 (2) (1) | 2023.10.24 |
|---|---|
| [Java] 11. 예외 처리 (1) (1) | 2023.10.23 |
| [Java] 14. 조건문과 반복문 (1) (0) | 2023.10.09 |
| [Java-FX] 3. Java FX 레이아웃 및 사건 기반 프로그래밍 (1) (0) | 2023.10.08 |
| [Java] 10. 상속과 구체화 (2) (0) | 2023.10.07 |